Black + White Chalkboard Birthday BBQ

This party was a bit of a last minute idea born out of a can of chalkboard paint and a large piece of wood. My son’s birthday was quickly approaching, and I knew that I wanted to do a southern style bbq, but since it was mostly our adult friends, I wasn’t sure what style I should go with. I wanted something classic, simple but dramatic, with a lot of personal details and photos of my son’s first two years.

I went with black and white, it’s the two colors that always go well together. I painted a large piece of wood with black chalkboard paint as the table backdrop, and I printed a garland of black and white photos as a timeline of my little guy’s life from birth through 2 years. Instead of tablecloths, I lined the tables with brown builder’s paper, and used a sliced potato to stamp a triangle pattern on it. Check out the DIY here. As table runners, I glued paint sticks together and painted them with the same chalkboard paint. I wrote fun little messages along the table runners, drawings of balloons, stars, birthday cake.

This was a quick and easy party concept to execute. It would work for an anniversary party, adult birthday, or even just a classic barbecue. Enjoy!

eyeheartprettythings-chalkboard-birthday-party-tableeyeheartprettythings-chalkboard-birthday-party-invitationeyeheartprettythings-chalkboard-birthday-party-photocollageeyeheartprettythings-birthday-party-chalkboard-drinkseyeheartprettythings-chalkboard-birthday-party-food

Photos by Amy Stone
Tagged , , , , ,

The best cookie you’ve ever tasted

eyeheartprettythings-saltedcaramel-cookies

I don’t say this lightly, these are by far the best cookies you will ever taste. As someone who doesn’t like chocolate (jaws drop in astonishment and people are constantly trying to convince me that maybe I’ve never HAD good chocolate, or maybe I just don’t like MILK chocolate… No people, I literally hate ALL chocolate.) So I have never been able to appreciate that craving one can get for a moist, chewy, delicious cookie. To me, a cookie is a cookie, no big deal. Until I made these for the first time. Then I finally understood the danger of keeping butter, flour & sugar stocked in my pantry.

Ingredients:
1 cup unsalted butter, softened
3/4 cup granulated sugar
1 cup brown sugar
1/3 cup caramel sauce
1 tbs vanilla
2 eggs
3 3/4 cups flour
1/2 teaspoon salt
1 1/2 teaspoons baking soda
1/2 cups white chocolate chips
1 bag Werther’s chewy caramels, cut into pea size pieces
Kosher sea salt, for sprinkling

Set oven to 350 degrees. Beat together the butter, sugar & brown sugar with an electric mixer until fluffy. Mix in the caramel sauce & the vanilla. Add the eggs one at a time & mix until combined.

In a different bowl, mix together the flour, salt and baking soda. Slowly add flour mixture to your wet ingredients, blending until combined. With a spatula, gently fold in the white chocolate chips & caramel bits. Keep dough cool in the fridge until you’re ready to bake.

Scoop a spoonful of cold dough & roll into a ball. Place on a parchment paper lined baking sheet. Sprinkle with a pinch of sea salt. Bake for 12-15 minutes or until golden around edges. Remove and let cool for 5 minutes then transfer to wire rack.

Tip: For fluffier, chewier cookies, I pop the cookie sheet of dough balls into the fridge for 3 minutes before putting them in the oven to bake. The extra cold dough makes the cookies lighter & fluffier. If you want flatter more crunchy cookies, skip this step :)

eyeheartprettythings-saltedcaramel-cookies-diy-1

eyeheartprettythings-saltedcaramel-cookies-diy-2

You could easily modify this by adding chocolate chips instead of white chocolate, or even some broken up salted pretzel pieces might be tasty!

Recipe adapted from here.

Tagged , , ,

Easter Instagram highlights

It’s been a busy week! I figured I’d do a little instagram highlight of our week getting ready for Easter with the kids. It’s so much fun to create traditions for each holiday. We make sure to share with the boys that Jesus is the reason we celebrate Easter, and then it never hurts to color some easter eggs, make adorable bunny cupcakes & have an egg hunt. :)

I have about a million of these little turquoise cardboard berry baskets leftover from Judah’s 1st birthday (see it here, it’s pretty cute) so I use them for everything. They’re perfect for little Easter baskets. We also used them for coloring eggs to send each kid home with a little basket of eggs.
eyeheartprettythings-easter-week-easterbasket

Believe it or not, I have never hard boiled an egg before. Seriously. My friend told me about doing them in the oven. (I found the recipe here.) If you put the eggs in mini cupcake tins it keeps them from rolling around. Genius!
eyeheartprettythings-easter-week-hardboiledeggs

Here’s my little dude coloring his eggs.
eyeheartprettythings-easter-week-coloringeggs

And the finished product! I love the deeper hued eggs. My 2 year old insisted on keeping each of his eggs in the dye for a minimum of 5 minutes, so they got nice and dark.
eyeheartprettythings-easter-week-eggs

Easter bunny cupcakes with marshmallow ears!
eyeheartprettythings-easter-week-bunny-cupcake

Another one of my little guy cause isn’t he just so cute in those ears? And that bunny basket he’s holding is my Easter basket from when I was little. :)
eyeheartprettythings-easter

Follow me on instagram + twitter for more creative ideas & DIY projects!

Tagged , , , , , ,

Strawberry Ice Cream Sandwiches

eyeheartprettythings-strawberry-ice-cream-sandwich

I made these strawberry ice cream sandwiches for a baby shower I hosted recently. I’m not a big chocolate lover (in fact, I hate chocolate) so I adapted this recipe to be non-chocolate and full of color.

Ingredients:
1/2 cup butter
1/3 cup brown sugar
1/4 cup granulated sugar
2 tbs milk
1/2 tsp vanilla extrat
1/4 tsp salt
1 1/4 cups flour
1/2 cup colored sprinkles
1 quart strawberry ice cream
Nonstick cooking spray

In a microwave safe bowl, melt together butter with brown sugar and granulated sugar.
Stir in the vanilla, salt and milk. Stir in the flour until smooth.

Line a large cookie sheet (or jelly roll pan) with parchment paper, extending past the edges. (this is so you can lift the flattened dough out once it’s frozen). Spray the parchment paper with nonstick spray. Press the dough into the pan on the parchment paper. Smooth it out to be as flat as you can, then sprinkle with colored sprinkles (the more the merrier!) Freeze for at least an hour. Meanwhile, take your strawberry ice cream out to get softened so it’s easier to spread.

After an hour, remove the frozen cookie dough. Cut it down the middle to create two large rectangles of cookie dough. Lift one of them out of the pan. Flip the other one around so the sprinkles face down on the parchment paper. Spread the softened ice cream on top in an even layer. Place second cookie dough layer on top, with sprinkles side up. Put back in the freezer for about an hour. Remove and slice into squares.

Tip: to keep the sandwiches from sticking when I stacked them, I cut long strips of parchment paper to wrap them up in.

eyeheartprettythings-strawberry-icecream-sandwich-diy

Follow me on instagram + twitter for more creative ideas & DIY projects!

Tagged , , , , ,

DIY Candy Sushi

I don’t know many kids who eat sushi, but I know some kids who LOVE this candy sushi! It’s such a creative treat for kids, and super simple too!
eyeheartprettythings candy sushi diy ninja birthday party
Supplies:
Rice Krispy cereal
Marshmallows
Fruit roll ups or Fruit by the Foot
Candy for inside (sour straws, gummy bears, etc)
Swedish fish

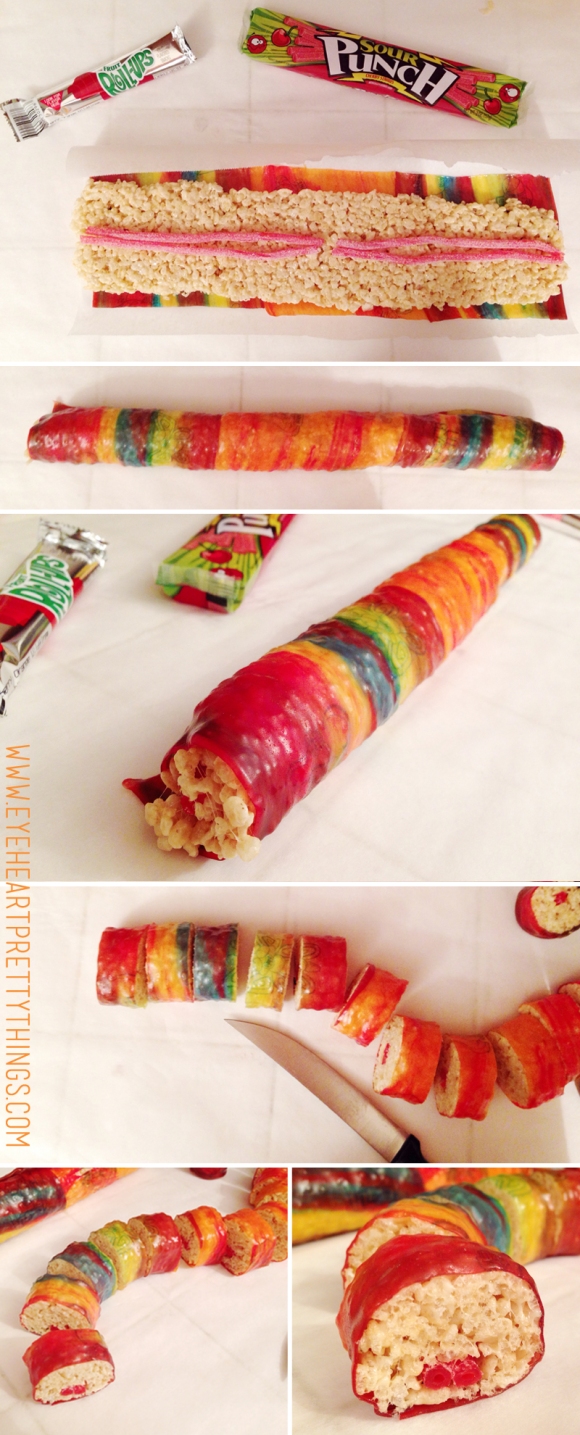
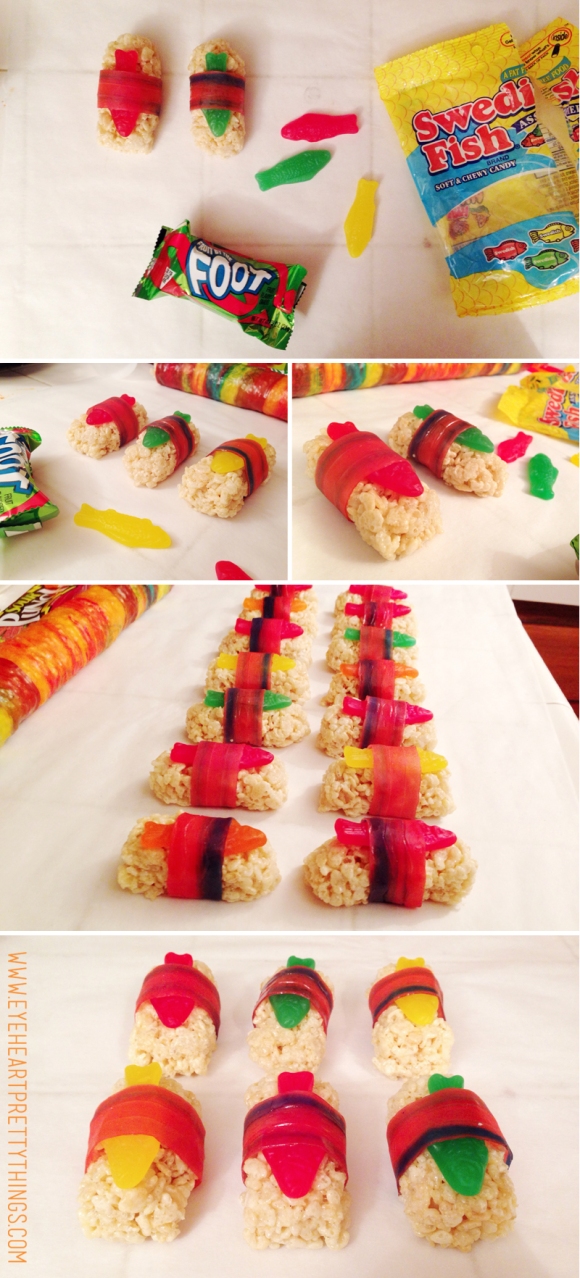
Sushi roll: Mix together some rice krispy treats (melted marshmallow’s and rice krispy cereal). Before the rice krispy mix hardens, form it into a long flat rectangle with your hands. Lay the rectangle onto a rolled out fruit roll up. Put some candy in the middle, and roll into a long log. Cut into 1″ wide rounds.
eyeheartprettythings-ninja-birthday-candysushi

Sashimi: Take rice krispy treat mix and form little flat rectangles (about the size of your thumb). Put a swedish fish on top and wrap with a strip of fruit roll up.
eyeheartprettythings-ninja-birthday-candysushi-sashimi

Follow me on instagram + twitter for more creative ideas & DIY projects!

Tagged , , , , , ,

DIY Gift Wrapping ideas

I teamed up with the wonderful Friedia Niimura to show you some creative and easy ways to wrap your gifts this holiday season. Check out the video and be sure to follow me on bloglovin for more fun ideas!!

XO
Kiira

Follow me on instagram + twitter for more creative ideas & DIY projects!

Tagged , , , , , , ,

DIY Wooden Geometric Centerpieces

Image

I needed a quick and inexpensive solution to fill space on my long thanksgiving table. I saw this idea on instagram by Lay Baby Lay and it is SO easy. I made 4 of these geometric boards for literally under $10, and popped some votives on top and there you have it…centerpieces!

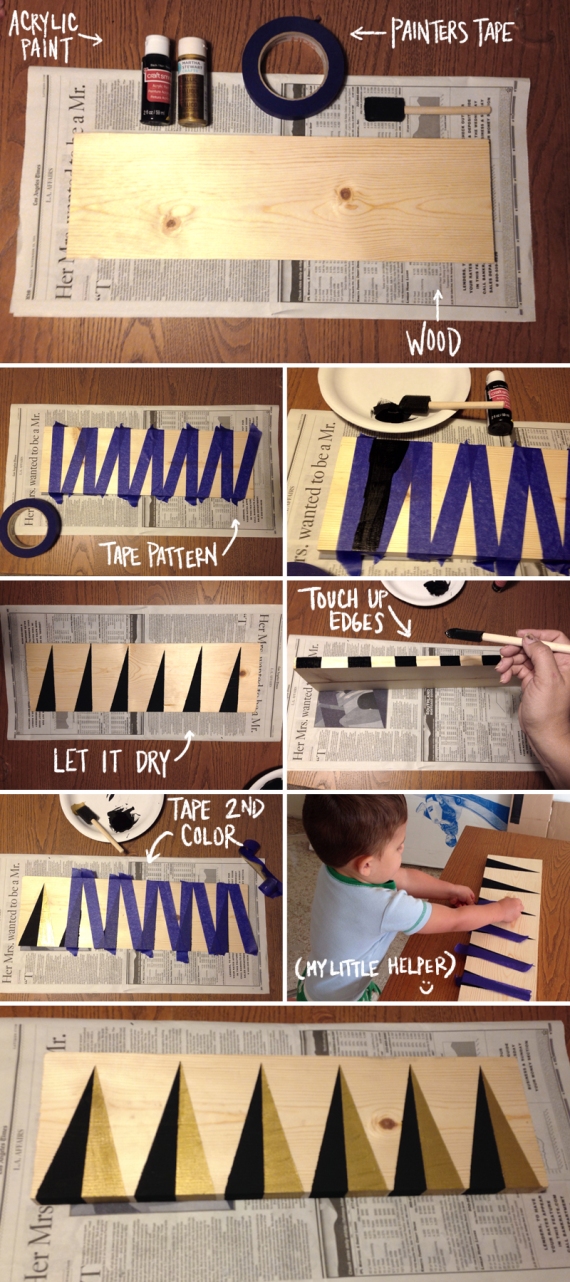
Go to the lumber section at home depot or any hardware store, and find a long piece of unfinished wood (I believe mine was about 8″x64″). The cheap stuff, mine was under $4 for the whole piece of wood. Have them cut it into 4 even pieces. At your local craft store (I went to Michael’s) buy some painters tape, acrylic paint (black and gold), and a foam brush. Below I’ve tried to show each step with photos. It was late at night and I had my 2 year old helping, so my apologies for the poor quality of photos :)

Here’s a quick rundown:

Tape your triangles across the board. I didn’t measure them out, I kinda winged it and just eyeballed the triangles to make them look about the same size and distance. Paint your first color (black) and let it dry. Then peel the tape off. When it’s completely dry, tape off the second triangle for the opposite side. Paint your second color (gold metallic) and let it dry. Peel off the tape, let it dry completely, and finito!

Image

XO
Kiira

Follow me on instagram + twitter for more party ideas & DIY projects!

Tagged , , , , ,

My First Hosted Thanksgiving

This year was my first time hosting Thanksgiving in my own home. I was excited and nervous, but mostly nervous about timing the food and wrangling my kids + 20 family members. Due to that fact, I didn’t get to capture many photos as I’d have liked, besides a few on instagram, so my apologies for the crappy imagery. A little recap to follow…

Prepping everything the night beforeImage

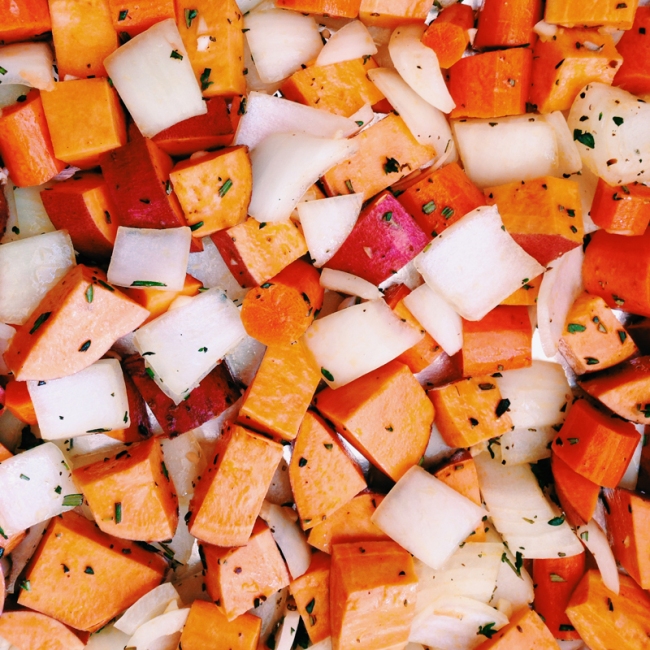
Root vegetables ready for roasting…Image

This party is simply lovely, stretching out the skin of the turkey to make lots of room for BUTTER!Image

Yes…that is all butter and herbs…Image

Roasted turkey fresh out of the oven…see the steam rising? #nomnomImage

Snacks before dinner…cheese from Trader Joe’s, fruit & charcuterieImage

Me (hi!) carving the turkey the way I learned on YouTube ;)Image

Table for the adults! (kiddie’s not shown)Image

And we’re done! Special note to the amaze-balls Sausage + Celery root stuffing recipe borrowed from the beautiful Jessica Burns!

Image

XO

Follow me on instagram + twitter for more party ideas & DIY projects!

Tagged , , , , , , ,

DIY Geometric Table runner

eyeheartprettythings-diy-party-potato-stamp-paper

I needed a quick solution to cover two long six foot tables for a party recently. I bought a giant roll of brown builders paper for only $11 at Home Depot (so cheap!!). I laid it on the tables and used masking tape to wrap the paper around the edges. I’ve been dying to try potato stamping for awhile now, so I went out and got a big russet potato and some black paint. I cut the potato in half, and then cut a triangle shape into it. You could do this with circles, squares, or a variety of shapes (depending on how talented you are at carving :)

Here’s a quick video I made on instagram showing the process.

XO
Kiira

Follow me on instagram + twitter for more party ideas & DIY projects!

Tagged , ,

DIY Baby Shower String Monogram

eyeheartprettythings-diy-babyshower-monogram-yarn-string-craft-3

I first saw this idea over at Green Wedding Shoes and I fell in love with it. I stored it away in the back of my mind for the future and this baby shower was the perfect place for it.

This DIY is so easy and super affordable. My friend Amy and I knocked it out in about 30 minutes. Each ball of yarn was under $3, and the wood was only $7. I think in total we spent under $20 to make it.

Supplies:
– Piece of wood (you could use reclaimed wood or brand new from the hardware store)
– Paper to trace letters
– Ruler
– Xacto blade (or scissors)
– Nails (we used medium sized nails)
– Yarn

We found the wood at a hardware store and they cut it to size for us. I used plain white paper to trace out the letters, cut them out and hammer the nails around the border of the paper to create our outlines.

eyeheartprettythings-diy-babyshower-monogram-yarn-string-craft-1

Once you’ve got your outlines, take your yarn and begin wrapping around the nails, in whatever pattern you like. You could do horizontal lines, vertical lines, or geometric shapes like we did. Keep wrapping your yarn until you’ve filled the space between the board and the head of the nail. This gives you a deep dimensional look and makes the colors really pop off the board.

eyeheartprettythings-diy-babyshower-monogram-yarn-string-craft-2

I had some leftover wood and yarn so I created a heart shaped one as an extra accent piece.

eyeheartprettythings-diy-babyshower-monogram-yarn-string-heart-4

There is so much possibility with this DIY. You could create any shape you can think of (as long as you can make it with nails!) Perfect for hanging in a nursery, living room, kitchen or even to give as a gift. Nothing beats a thoughtful hand crafted gift. I’ll be making many more of these in the future! :)

Happy crafting!
XO
Kiira

Credits:
Photography: Amy Stone
Wood & Nails: Home Depot
Colored yarn: JoAnn’s Fabrics

Tagged , , , , ,