Tag Archives: party

Ninja vs. Godzilla Birthday Party Prep!

My little ninja has been obsessed with ninjas (see last years Ninja Turtle birthday), so we’re throwing him a ninja vs. godzilla birthday at SkyZone where the kids can practice their ninja flip kick skillzzz :)

I created this rad godzilla for ninja training by cutting out a large piece of cardboard and painting it with poster paint. The plan is for the kids to chuck foam ninja stars through his mouth and win fun prizes.

Take-out boxes are super cute for party favors. I filled them with tiny ninja figurines, temporary tattoos, edamame jelly beans, and a ninja star on top.

I designed and printed all the paper goods. These party circles are a cute and easy way to top cupcakes. I printed them on cardstock and punched them out with a 3″ round punch I bought from Michael’s for under $10. Then I taped them onto popsicle sticks to put on each cupcake.

I created stickers, water bottle wraps, food signs, and edamame baggies filled with green jelly beans. I’ll post a DIY tutorial for the edamame coming soon! :)

Happy Ninja Birthday!

Follow me on instagram + twitter for more creative ideas & DIY projects!

Advertisement
Tagged , , , , , , , ,

Happy Thanksgiving | Dinner Party

I paired up with my good friend Jessica Burns this week to create a delicious pre-thanksgiving dinner party for all of our friends before the real Thanksgiving, which we all spend with our families. This was my first time hosting a Thanksgiving style meal at my house, turkey… ham… stuffing… So I was definitely intimidated by the task, until I observed the grace and talent that Jessica has when preparing for an event :)

Jess and I settled on a rustic autumn theme, and I started by designing these invitations (yes! actual paper invitations that I mailed with a stamp, no evite this year!) I also created custom paper envelope liners and little details to match throughout the entire party.
eyeheartprettythings-thanksgiving-1

We took an old steamer trunk and lined it with burlap as our drink station. I wrapped rustic mason jars with hemp twine and patterned paper liners that I designed and printed from my home printer. I found my favorite paper straws in gray and white stripes and I created little flags for each one.

eyeheartprettythings-thanksgiving-2

For the table we used a simple white tablecloth with a burlap runner and autumn colored pomegranates, crab apples, pears and persimmons that we picked up from the local produce market. I love the simplicity of the green and white floral arrangements that Jessica created in the mercury glass vases. For each place setting I created mini chalkboards with each guests name written on them. I cut small pieces of wood into squares and bought chalkboard paint at the hardware store. These are such a cute takeaway for your guests, and super easy and cheap to make! Our intent was to have everyone go around the table and draw something that they were thankful for, but we ended up having so much fun that we forgot to do it! :)
eyeheartprettythings-thanksgiving-3

Now for the food… All thanks goes to Jessica for making this delicious meal happen. I can’t say enough how amazing she is in the kitchen! She set up a gorgeous cheese, meat and fruit platter, and I can’t forget to mention her signature Burrata in a jar…yummmm! It was an amazing meal complete with a perfectly golden turkey, ham, roasted root vegetables, celery root stuffing, brown butter mashed potatoes, minted peas and carrots. I’m blown away that it was all done from my quaint little kitchen! I painted a slab of wood with the leftover chalkboard paint to create a double sided chalkboard menu for dinner and dessert. It added rustic charm to the table overflowing with good food.eyeheartprettythings-thanksgiving-4

For dessert Jessica made her Pumpkin Swirl cheesecake squares, I made a Spiced layer cake with molasses cream cheese frosting, and we had, of course, a pumpkin pie. This was such a fun and creative dinner party. Thank you again to Amy of Amy Stone Photography for taking such stunning photos of everything! I am so blessed by the friends that we have surrounding us and cannot wait to do this again! :)eyeheartprettythings-thanksgiving-5

Tagged , , , ,

Pineapple Hyper-color Birthday!

eyeheartprettythings-pineapple-birthday-1

It was the middle of August and it was hot! I wanted a refreshingly fun and bright birthday party, and what is more refreshing than fresh pineapple? I focused on pineapples and bright, hyper-colors for decoration. I folded neon yellow poster paper into a geometric triangle pattern and wrapped it around my sansevieria plants to look like giant pineapples on the dessert table. I collected walnuts and sprayed them neon yellow and hot-glued green spikes to the top as mini-pineapples to line the table with. And I wrapped the dinner table with white butcher paper and plunked neon sharpees into mason jars so the kids could color all over the table and make a bright, fun mess. :)

I served a hawaiian inspired meal to all our friends, using pineapple as a main ingredient. For dessert, I had a candy bar with neon candy dots and lemon heads. I made tie-dye cupcakes, bright krispy treats made out of fruity pebbles, and I scooped fresh pineapple with a melon baller and dipped them like cake-pops into melted candy coating.

I found a ton of neon goodies at the dollar store. Neon play-doh, neon water balloons… So I set up a play-doh station for the kids and we had a giant water balloon battle between the grown-ups and the kids at the end of the party. Keeping cool with a water balloon fight in the August heat will definitely become a birthday tradition!!

eyeheartprettythings-pineapple-birthday-3eyeheartprettythings-pineapple-birthday-2

Follow me on instagram + twitter for more DIY projects & inspiration!

Tagged , , , , , ,

DIY Candy Sushi

I don’t know many kids who eat sushi, but I know some kids who LOVE this candy sushi! It’s such a creative treat for kids, and super simple too!
eyeheartprettythings candy sushi diy ninja birthday party
Supplies:
Rice Krispy cereal
Marshmallows
Fruit roll ups or Fruit by the Foot
Candy for inside (sour straws, gummy bears, etc)
Swedish fish

Sushi roll: Mix together some rice krispy treats (melted marshmallow’s and rice krispy cereal). Before the rice krispy mix hardens, form it into a long flat rectangle with your hands. Lay the rectangle onto a rolled out fruit roll up. Put some candy in the middle, and roll into a long log. Cut into 1″ wide rounds.
eyeheartprettythings-ninja-birthday-candysushi

Sashimi: Take rice krispy treat mix and form little flat rectangles (about the size of your thumb). Put a swedish fish on top and wrap with a strip of fruit roll up.
eyeheartprettythings-ninja-birthday-candysushi-sashimi

Follow me on instagram + twitter for more creative ideas & DIY projects!

Tagged , , , , , ,

Featured by Hostess with the Mostess!

eyeheartprettythings-hwtm-backyard-bbq-farmersmarket

I’m super excited that Judah’s 1st birthday party is being featured today by Hostess with the Mostess! Check it out here, and check my blog for some of the affordable DIY decorations I created to make this party extra special :)

XO
Kiira

To see more glimpses into my day, check me out on Instagram!

Tagged , , , , ,

Carnival Birthday Party

I started planning this birthday party in my head a few months in advance while perusing the internet late at night. So I had plenty of time to make hundreds of those little yarn pom-pom balls. I love taking inexpensive items & jazzing them up with the help of the craft and hardware store. I think I probably went to Michael’s 4 or 5 times throughout this process. The good news is it’s only about 4 blocks from where I live so it wasn’t a huge deal :)

The invitations and all the paper goods I designed and printed myself, even the envelope liners!
eyeheartprettythings+carnival+birthday+invite
eyeheartprettythings+carnival+birthday+paperie

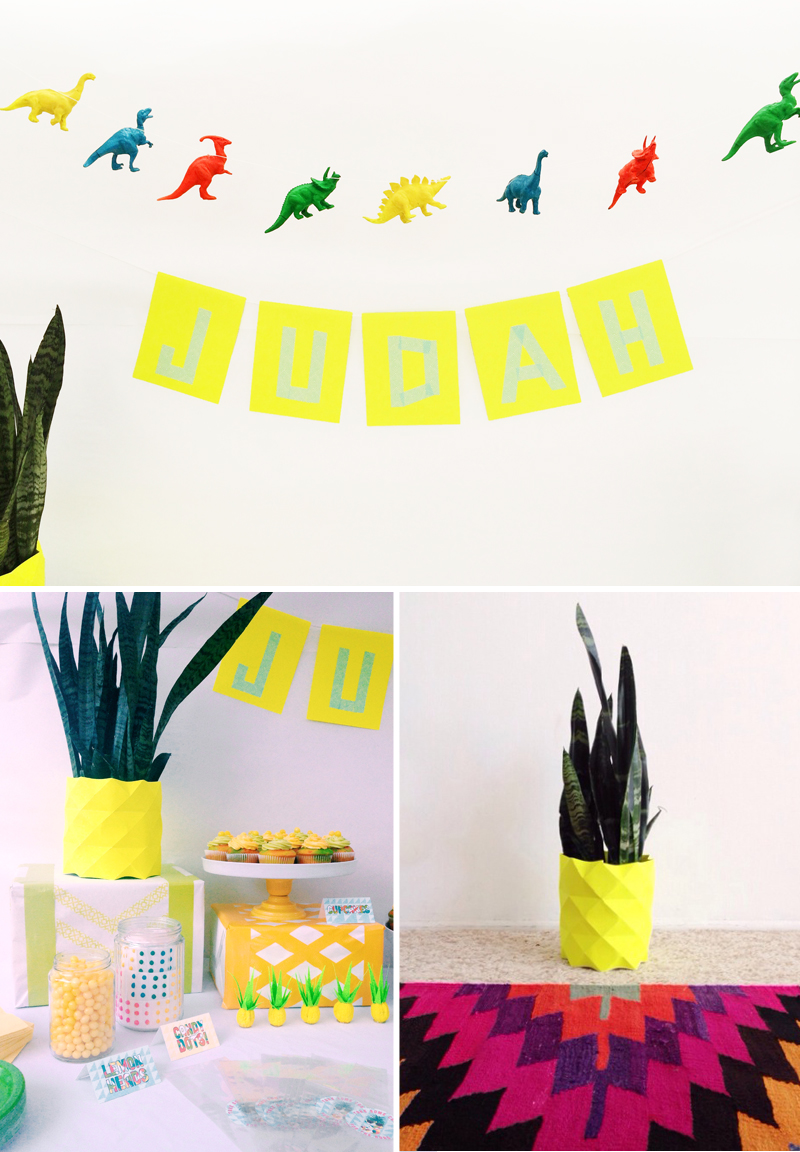
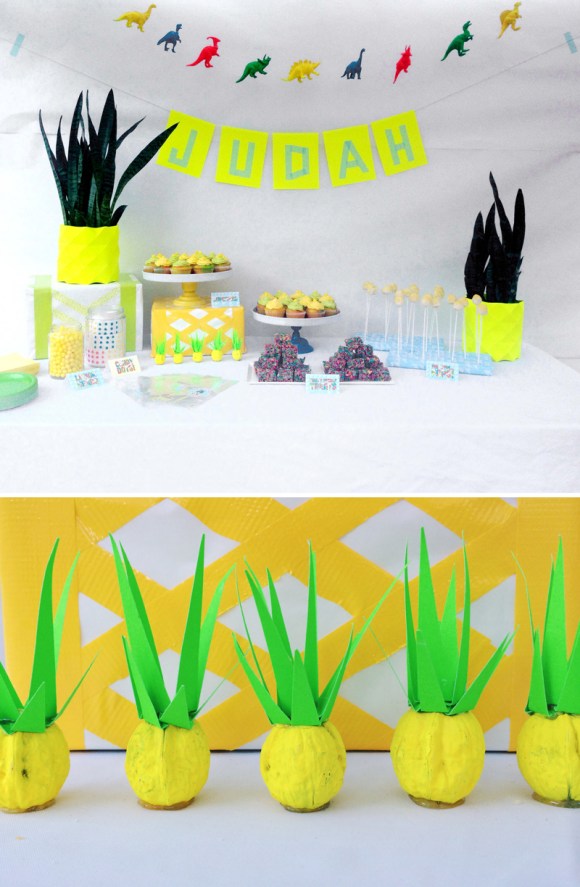
I’ve been on a chalkboard-paint kick ever since Thanksgiving when I created chalkboard coasters for each guest at our dinner. I bought an ornate frame from Ikea, primed & glossed it with bright green spray paint to make it candy-coated, and painted the center with chalkboard paint. I am in love with this frame. All the brightly colored bunting flags I created for super cheap! I bought 8.5×11″ pieces of felt in each color (they’re only 29 cents each!) and some white string. Each piece of felt makes 10 flags, so with 7 colored felt pieces I had a ton of flags and was able to create several long strands. The white letters are also sold at the craft store and already have adhesive on the back. Super simple, and all the flags were under $10!

The food and dessert was the main event. I wanted to keep everything miniature…mini sliders, mini hot dogs, mini donuts, and such. I’ve been collecting soup cans for months because I wanted to do a dish served in individual cans. Micah and my husband love tater tots, so we did seasoned tater tots in cans and they were a HIT!

eyeheartprettythings+carnival+birthday+dessert

For dessert I made rice krispy pops because the idea of making cake pops seemed too daunting what with all the other things I had planned. (I ended up making about 20 little cake balls with the tops of each cake layer when I was leveling them out and I must say they turned out pretty good). We bought the wooden dowels from the craft store and cut them to size for the candy popcorn balls (which I ordered from Kernel Encore) and I created the little flavor flags too. The cake I colored with actual fruit (recipe here) which was one of my favorite items. I loved that each layer had a flavor…strawberry, blueberry, lemon, orange… I also did a layered jello in mason jars using this recipe, which was rather time  consuming but well worth the effort. Who knew you could create white jello with gelatine and sweetened condensed milk?! I’ll be using this technique for years to come.

I saw some gorgeous cake plates by Iacoli & McAllister, but they are super expensive! Instead, I shopped around my local thrift stores for several different sized candlesticks. I primed them and painted them with high-gloss spray paint and they look so great. The red one looks so shiny like a candy apple! I found completely flat white platters (I didn’t want the angle of a dinner plate) at Ikea for under $10 each and I used gorilla glue to secure each plate to the top of each candlestick. Presto, I have hundred+ dollar cake pedestals for under 20 bucks each which I used for the cake and dessert pops.

eyeheartprettythings+carnival+birthday+boy

The photo collage idea was inspired by Martha Stewart. We have so many amazing photos of our little guy taken by our good friend Amy Stone, and I wanted to share them all with everyone at the party. It also was a conversation topic, a timeline of Micah’s 3 years, from being a newborn, to walking, his first trip to Disneyland, to potty training, all leading up to now. I bought glossy photo paper and printed these all on my inkjet at home and cut them out to arrange them in the shape of a 3. Another very affordable decoration idea. Overall the party was a giant hit and everyone left in a giant sugar-induced coma :)

Printables, Styling, Food & Desserts: Kiira Turnbow of eyeheartprettythings
Photography: Amy Stone
Craft Supplies: Michael’s & Home Depot

Tagged , , ,
%d bloggers like this: