Tag Archives: decor

DIY Wooden Geometric Centerpieces

Image

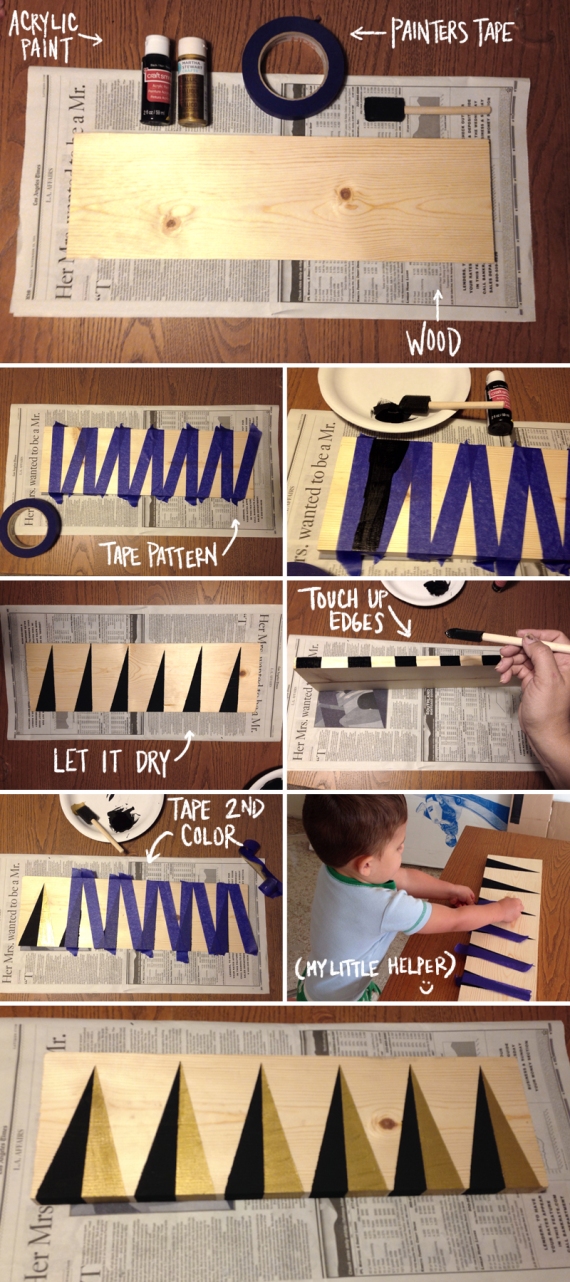
I needed a quick and inexpensive solution to fill space on my long thanksgiving table. I saw this idea on instagram by Lay Baby Lay and it is SO easy. I made 4 of these geometric boards for literally under $10, and popped some votives on top and there you have it…centerpieces!

Go to the lumber section at home depot or any hardware store, and find a long piece of unfinished wood (I believe mine was about 8″x64″). The cheap stuff, mine was under $4 for the whole piece of wood. Have them cut it into 4 even pieces. At your local craft store (I went to Michael’s) buy some painters tape, acrylic paint (black and gold), and a foam brush. Below I’ve tried to show each step with photos. It was late at night and I had my 2 year old helping, so my apologies for the poor quality of photos :)

Here’s a quick rundown:

Tape your triangles across the board. I didn’t measure them out, I kinda winged it and just eyeballed the triangles to make them look about the same size and distance. Paint your first color (black) and let it dry. Then peel the tape off. When it’s completely dry, tape off the second triangle for the opposite side. Paint your second color (gold metallic) and let it dry. Peel off the tape, let it dry completely, and finito!

Image

XO
Kiira

Follow me on instagram + twitter for more party ideas & DIY projects!

Tagged , , , , ,

DIY Baby Shower String Monogram

eyeheartprettythings-diy-babyshower-monogram-yarn-string-craft-3

I first saw this idea over at Green Wedding Shoes and I fell in love with it. I stored it away in the back of my mind for the future and this baby shower was the perfect place for it.

This DIY is so easy and super affordable. My friend Amy and I knocked it out in about 30 minutes. Each ball of yarn was under $3, and the wood was only $7. I think in total we spent under $20 to make it.

Supplies:
– Piece of wood (you could use reclaimed wood or brand new from the hardware store)
– Paper to trace letters
– Ruler
– Xacto blade (or scissors)
– Nails (we used medium sized nails)
– Yarn

We found the wood at a hardware store and they cut it to size for us. I used plain white paper to trace out the letters, cut them out and hammer the nails around the border of the paper to create our outlines.

eyeheartprettythings-diy-babyshower-monogram-yarn-string-craft-1

Once you’ve got your outlines, take your yarn and begin wrapping around the nails, in whatever pattern you like. You could do horizontal lines, vertical lines, or geometric shapes like we did. Keep wrapping your yarn until you’ve filled the space between the board and the head of the nail. This gives you a deep dimensional look and makes the colors really pop off the board.

eyeheartprettythings-diy-babyshower-monogram-yarn-string-craft-2

I had some leftover wood and yarn so I created a heart shaped one as an extra accent piece.

eyeheartprettythings-diy-babyshower-monogram-yarn-string-heart-4

There is so much possibility with this DIY. You could create any shape you can think of (as long as you can make it with nails!) Perfect for hanging in a nursery, living room, kitchen or even to give as a gift. Nothing beats a thoughtful hand crafted gift. I’ll be making many more of these in the future! :)

Happy crafting!
XO
Kiira

Credits:
Photography: Amy Stone
Wood & Nails: Home Depot
Colored yarn: JoAnn’s Fabrics

Tagged , , , , ,